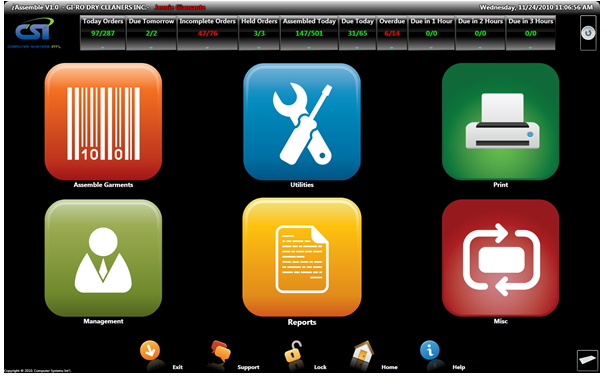
Main menu of iAssemble is designed to give user easy access to different functions of the system. Status Menu on the top shows the live status of the assembly process.
As orders are checked in through TMS, Today Orders is updated simultaneously, and gives user immediate feedback of total orders coming up.
When orders are assembled and completed, Assembled Today is updated.
Due Today gives running total of all due orders/pieces that not assembled yet.
Overdue, or due 1 hour, 2 hours etc give immediate feedback if promised due time/date is missed.
Just click on the icons to get detail description of each orders/pieces.
To refresh the status bar, select Refresh button on the top right hand corner of the menu.
Assemble Garments:
Assemble Garments is the main function of iAssemble system. Select Assemble Garments menu to start the process.
1. Scan the tracking tag barcodes on the garment, iAssemble automatically assigns a hook# on the conveyor/rail to the invoice. The Hook# is displayed on the screen in large font.
Invoice detail is shown on the right hand side of the screen. The current scanned garment is highlighted in yellow. Invoice#, item description, tracking#, due time/date, and total items are shown at the bottom of the screen.
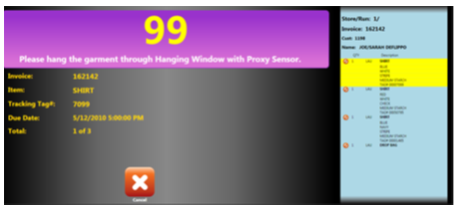
2. The conveyor moves to the hook number and stops. Blue LED on the controller is turned on, and controller displays the location. iAssemble instructs the operator to place the garment onto the hook.
3. Garment is put on the conveyor through the Hanging Window that is equipped with Proxy sensor. As hanger is detected by Proxy Sensor, iAssemble is informed of the current location, system verifies the loading location.
If hook# matches the assigned location, system turns off the Blue LED, and allows the next garment to be scanned.
If racks are used, operator hangs the garment on the assigned hook, then scans the hook# barcode to confirm. If hook# matches the assigned location, the system allows the next garment to be scanned.
Scanning hook# is optional. This option can be disabled from management, but it is recommended as it prevents errors. If hook# is not scanned, the user has to press the Hang button on the screen. Otherwise Hang Icon is hidden.
If mistake is made, press Cancel button to remove the order from the designated location.
Don’t press Cancel button if conveyor is moving.

4. Repeat the above process for each garment.
5. Once the final garment is scanned, the conveyor automatically rotates to the location where the rest of the garments are, and informs the operator that order is ready. Ready screen will be flashing in Red.
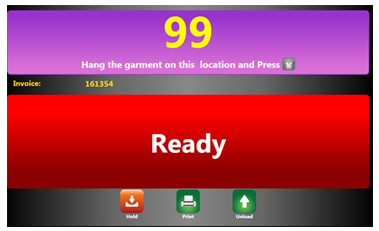
6. The operator is instructed to unload the order. You may select Unload, or scan the unload barcode to save a keystroke (this barcode is available from CSI). As order is unloaded and removed from the conveyor/Rack, the corresponding invoice is printed.
7. If you wish to hold the order for whatever reason, select Hold button. Held Invoices can be unloaded using Held Order Function.
8. Press The Print Button in case you need to reprint the invoice.
9. The order is now ready for bagging.
Comments
0 comments
Please sign in to leave a comment.